Last updated May 01, 2020
The RAMP API add-on requires both a Salesforce org and Heroku Connect.
RAMP is “The 90 day idea to app framework”.
The framework provides you with all the essential building blocks: User Authentication and Identity Management, Push Notifications, Marketing Automation, Image and Video Transformation, Asset Storage and Delivery, all connected to Salesforce via Heroku Connect. Deliver your game changing enterprise app to market 60% faster with RAMP.
Provisioning the add-on
Unlike with most add-ons, you provision RAMP by first deploying a template Heroku app via this Heroku Button:

Specify a name, owner, and region for the template app and click Deploy app. The template app provisions the RAMP add-on (along with the Heroku Connect add-on) automatically during its creation.
You can open your newly created template app from the Heroku Dashboard, or with the heroku open command. The app’s landing page shows a list of RAMP objects.
After the RAMP add-on is provisioned, the RAMP_LICENSE_KEY config var is available in the template app’s configuration. You can confirm this via the heroku config:get command:
$ heroku config:get RAMP_LICENSE_KEY --app replace-with-template-app-name
Configuring the integration
The RAMP add-on requires a Salesforce org.
Step 1: Install the RAMP Managed Package in your Salesforce org
RAMP defines a set of objects that must be present in your Salesforce org for the add-on to function. To add these objects to your org:
- In your browser, append the following path to your Salesforce org’s root URL and navigate to it:
/packaging/installPackage.apexp?p0=04t41000002O4I9 - Enter your password.
- Select Install only for admins and click Install.
This step will provision all of the RAMP objects and will only take a few seconds. You will receive an email confirmation once the package is installed.
Step 2: Configure Heroku Connect
After the package is installed, go back to the Heroku Dashboard to connect the Salesforce org to Heroku.
Click on your Heroku Connect add-on to begin the configuration.
Next, click set-up connection. Our database will be Postgres.
You will be prompted to log in to Salesforce.
When you see the message provisioning the database, you choose your Salesforce environment. After you log in to Salesforce, click Allow to complete the connection to Salesforce. You can now pull up all of the metadata from the Salesforce org to set up the object/table mappings.
Click Create Mapping. This loads all the metadata and objects from Salesforce. For demo purposes, we will choose a couple RAMP package objects.
First, find and select the Organization object.
Then, select all the fields to sync, set the poll frequency, etc. Click accelerate polling for enhanced performance. RAMP uses an external ID to update as the unique identifier.
Now, create field mappings. If you want to map a field in the database, simply click on the field and then click save. Now we’ve created our Salesforce schema and our first table in Postgres, which will be the organization.
Local development setup
If you are using Linux, remove all instances of win in the examples below.
- Clone the Ramp API GitHub repository: https://github.com/trifinlabs/ramp-api
- Create a new repository on GitHub or another managed version control serivce to manage your own RAMP API development.
- Navigate to your local project and create a new file called
.env. Copy the config vars created in the Heroku app creation steps to the
.envfile. For example:AUTH0_CLIENT_ID=bny0xMZky6A7N3gfVW1gL4AkezVBtnZsRun the following commands from the project’s root folder:
npm installThis installs the RAMP secure API and other necessary node packages.
npm run cli-win -- discover –allNewModelsFor MacOS users: npm run cli-macos -- discover --allNewModelsThis sets up the
modelsfolder with the ramp objects. This command can be run for any new models that need to be created or added via Salesforce.Run the following command to get help for other CLI commands:
npm run cli-win – helpFor Mac users: npm run cli-macos -- helpAfter the above commands have been run and the
.envfile is populated, the local API is ready to be started via the following command:npm run start-winFor Mac users: npm run start-macosVerify that your local server is running by opening a browser and navigating to
http://localhost:5000/explorer. You should see all of the current models in the model folder in the API explorer.
As changes are made to your code and need to be redeployed to Heroku, you will need to configure a deployment pattern for the repository you created in step 2 above (via the Heroku CLI, a continuous integration tool, etc.).
Local development walkthrough
The local environment has a number of configuration files and packages. This section walks you through each of these files and packages to gain a better understanding of the RAMP API and how to develop the API further. Below is an image of all of the potential files and folders that can be added to the API to expand functionality:
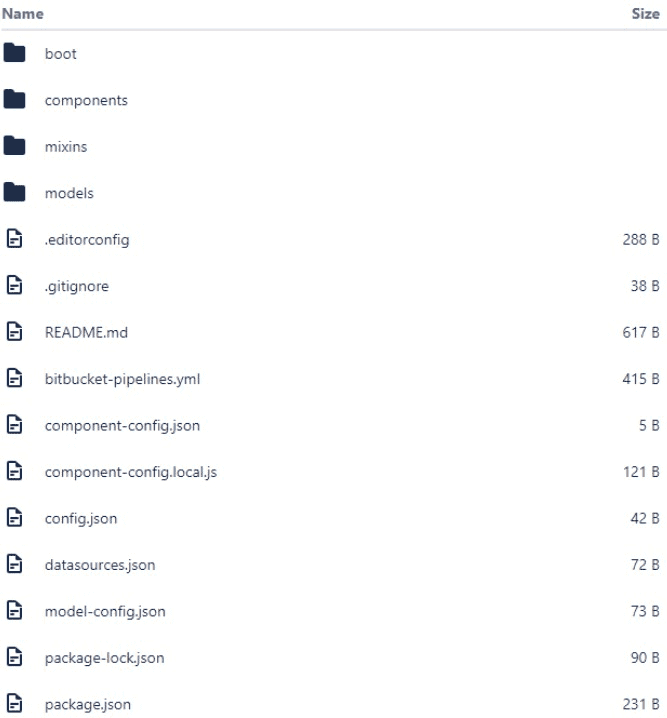
The API is versioned based on a Node Loopback pattern and a description of each of these folders can be found on loopback:
- boot: https://loopback.io/doc/en/lb2/Defining-boot-scripts.html
- components: https://loopback.io/doc/en/lb2/LoopBack-components.html
- mixins: https://loopback.io/doc/en/lb2/Defining-mixins.html
- models: https://loopback.io/doc/en/lb2/Defining-models.html
All of the files within these folders will be concatenated with standard RAMP API functionality where possible and will override functionality where not.
Models are the workhorse and lifeline connection to both the database and Salesforce. They should be generated using the CLI command from the section above. This command runs directly against the database configured in the .env file and will guarantee the model’s properties match those properties set up on the database columns in Postgres.
Models contain both a .js and a .json file. The .json file contains a name, options, list of properties (columns), field types, ACLs, hidden fields, etc. The .js file for the model contains any custom REST endpoints, parsers, etc. If you run the CLI command from the setup above each time a new model needs to be added, the models will also be added to the model-config.json file. If you add the models manually, you will need to add the model to the model-config.json file as well.
The RAMP API setup also allows for multiple data source integration. By default, the Heroku Postgres database datasource is configured for each model created. This datasource is the database provisioned in the initial setup procedure above in Heroku. You can append more data sources to this as well, including: file systems (AWS, Azure, etc), databases, in-memory, and local file systems. The datasources.json file is where these new data sources can be placed. These data sources, like the folders and packages in the local development environment, are concatenated with the default Heroku Postgres datasource and will not overwrite functionality.
Removing the add-on
You can remove RAMP via the CLI:
This will destroy all associated data and cannot be undone!
$ heroku addons:destroy ramp
-----> Removing ramp from sharp-mountain-4005... done, v20 (free)
Support
All RAMP API support and runtime issues should be submitted via one of the Heroku Support channels.