Last updated December 03, 2024
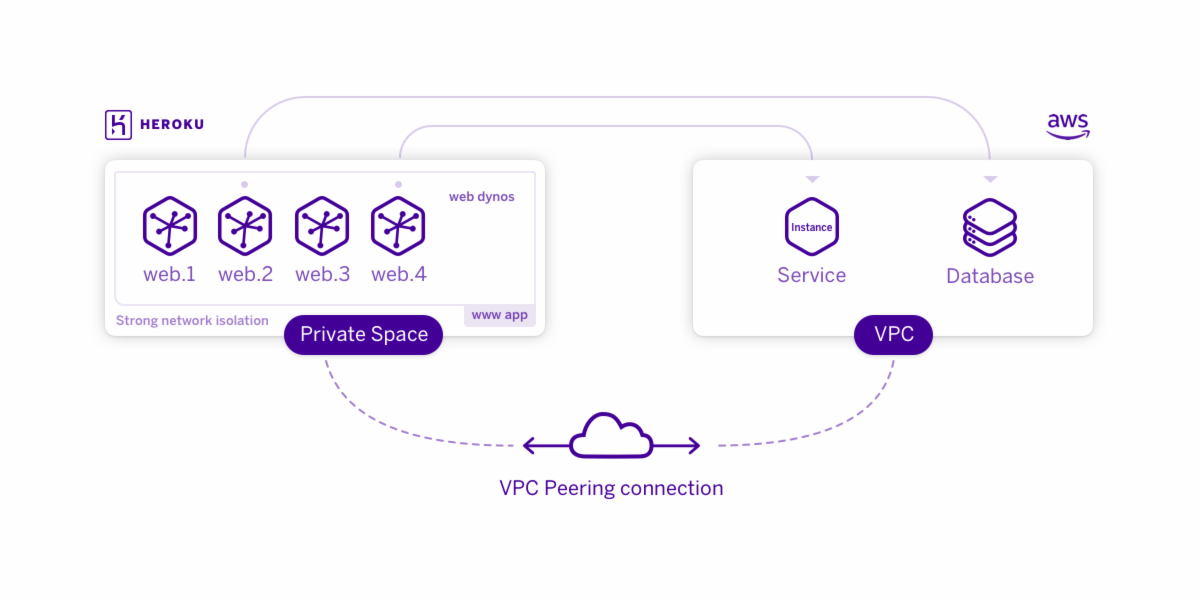
Private Space Peering enables you to establish a private network connection between dynos running in a Heroku Private Space and an AWS VPC you control. This connection does not traverse the public Internet.
VPC peering is not yet available for Fir-generation spaces. Subscribe to our changelog to stay informed of when we add this feature to Fir.
Prerequisites for peering
- The VPC must use a compatible IPv4 CIDR Block in its network configuration.
- The VPC must use an RFC1918 CIDR block (
10.0.0.0/8,172.16.0.0/12, or192.168.0.0/16). - The VPC’s CIDR block must not overlap with the Private Space CIDR ranges. The default ranges are
10.0.0.0/16,10.1.0.0/16, and172.17.0.0/16. Private Space CIDR range can be specified when creating a new space. - Your AWS account must have permission to make a VPC peering connection request.
Inter-region peering has some limitations. See AWS VPC Peering documentation for details.
Creating a peering connection to your Private Space
To configure peering, you submit a peering request from your AWS VPC and then confirm it via the Heroku dashboard or CLI.
To submit a peering request, you need to know the AWS Account ID and the VPC ID of your Private Space. You can use the heroku spaces:peering:info command to retrieve this information:
$ heroku spaces:peering:info spaces-peering-example
=== amerine-peering-demo Peering Info
AWS Account ID:    847227832372
AWS Region:        us-east-1
AWS VPC ID:        vpc-e291cc85
AWS VPC CIDR:      10.0.0.0/16
Space CIDRs:        10.0.128.0/20, 10.0.144.0/20, 10.0.0.0/20, 10.0.16.0/20
Unavailable CIDRs: 10.1.0.0/16
The
AWS Account IDandAWS VPC IDfields contain the information you’ll need when making the peering request via AWS.The
AWS VPC CIDRfield contains the CIDR block in use by the Private Space VPC you’ll peer with.The
Space CIDRsare the CIDR blocks from which your dyno and ELB addresses are assigned. You can use this information to route CIDR blocks (rather than the AWS VPC CIDR, which is a/16block) inside your VPC.
Before you initiate a peering connection, ensure that your VPC does not overlap with the values of either AWS VPC CIDR or Unavailable CIDRs.
To initiate a peering request you can use the AWS CLI or the AWS Management Console. This guide demonstrates initiating peering with the AWS command-line utility’s create-vpc-peering-connection command:
$ aws ec2 create-vpc-peering-connection --vpc-id vpc-YOUR_VPC_ID --peer-vpc-id vpc-e291cc85 --peer-owner-id 847227832372
{
    "VpcPeeringConnection": {
        "Status": {
            "Message": "Initiating Request to 847227832372",
            "Code": "initiating-request"
        },
        "Tags": [],
        "RequesterVpcInfo": {
            "OwnerId": "YOUR_AWS_ID",
            "VpcId": "vpc-YOUR_VPC_ID",
            "CidrBlock": "10.100.0.0/16"
        },
        "VpcPeeringConnectionId": "pcx-111aaa111",
        "ExpirationTime": "2016-09-26T22:57:33.000Z",
        "AccepterVpcInfo": {
            "OwnerId": "847227832372",
            "VpcId": "vpc-e291cc85"
        }
    }
}
After you make the peering request on AWS you can track it with the Heroku CLI’s spaces:peerings command. Your peering request is the entry with a Status of pending-acceptance:
$ heroku spaces:peerings spaces-peering-example
=== spaces-peering-example Peerings
PCX ID        Type            CIDR Block     Status              VPC ID              AWS Region         AWS Account ID  Expires
────────────  ──────────────  ─────────────  ──────────────────  ──────────────────  ─────────────────  ──────────────  ────────────────────
pcx-111aaa111 unknown         10.100.0.0/16  pending-acceptance  vpc-YOUR_VPC_ID     YOUR_AWS_REGION    YOUR_AWS_ID     2016-09-26T22:57:33Z
******        heroku-managed  10.1.0.0/16    active              ******              ******             ******
You can accept the peering connection with the spaces:peerings:accept CLI command. Include the PCX ID of the request:
$ heroku spaces:peerings:accept pcx-111aaa111 --space spaces-peering-example
Accepting and configuring peering connection pcx-111aaa111
After you accept the peering request, you can inspect the connection’s details with the spaces:peerings command. The connection is listed with a Type of customer-managed:
$ heroku spaces:peerings spaces-peering-example
=== spaces-peering-example Peerings
PCX ID        Type            CIDR Block     Status      VPC ID              AWS Region         AWS Account ID  Expires
────────────  ──────────────  ─────────────  ──────────  ──────────────────  ─────────────────  ──────────────  ────────────────────
pcx-111aaa111 unknown         10.100.0.0/16  active      vpc-YOUR_VPC_ID     YOUR_AWS_REGION    YOUR_AWS_ID     2016-09-26T22:57:33Z
******        heroku-managed  10.1.0.0/16    active      ******              ******             ******
Heroku manages other peering connections in the Private Space to allow private networking to certain add-on partners. These connections have the type heroku-managed or heroku-postgresql, and they cannot be modified.
Setting up routes
After you establish a peering connection, you must update the route table in your VPC so packets can be routed between the Private Space and the VPC.
First, obtain your VPC’s routing table ID with the following AWS CLI command:
$ aws ec2 describe-route-tables
Look for the route table with the same VPC ID as your VPC and obtain its route table ID.
At this point, you can choose to either add a single route for the entire Private Space CIDR (recommended) or add specific routes for the subnets that contain resources that components in your VPC will be interacting with.
Option 1: Add one route for entire Private Space CIDR block (recommended)
Provide the routing table ID to the create-route AWS CLI command:
$ aws ec2 create-route --route-table-id rtb-your-route-table-id --destination-cidr-block 10.0.0.0/16 --vpc-peering-connection-id pcx-111aaa111
The destination-cidr-block must be the CIDR range for your Private Space
Option 2: Add multiple routes to specific Private Space subnets
$ aws ec2 create-route --route-table-id rtb-your-route-table-id --destination-cidr-block 10.0.1.0/20 --vpc-peering-connection-id pcx-111aaa111
The destination-cidr-block argument must match one of the Space CIDRs indicated by the heroku spaces:peering:info command. You must run the create-route command for each of the Space CIDRs.
Setting up security groups
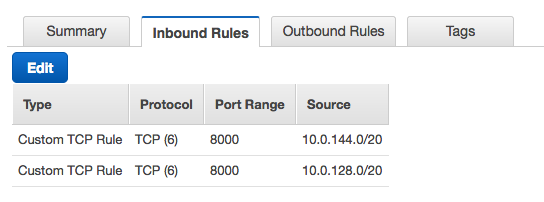
You must ensure that the security group assigned to resources in your VPC allows traffic from your Private Space.
For example, if a web server on an EC2 instance is listening on port 8000, you must create an inbound rule to allow access on port 8000 from each of the dyno IP ranges (e.g., 10.0.144.0/20 and 10.0.128.0/20) in your Private Space:
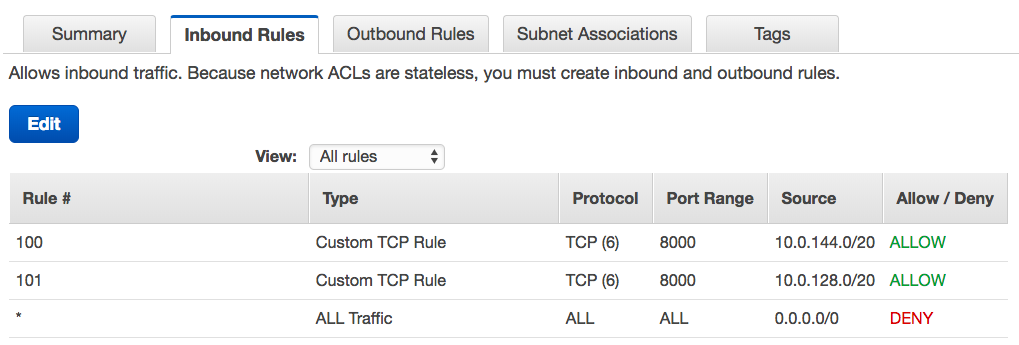
Setting up network ACLs (advanced)
By default a VPC is set up with a network ACL that allows all inbound and outbound traffic and most customers restrict traffic at the resource level, via security groups. If your organization is restricting traffic to the subnet via a network ACL, you’ll have to create a traffic rule to allow inbound traffic from your Private Space.
For example, if a web server on an EC2 instance is listening on port 8000, you must create an inbound rule to allow access on port 8000 from each of the dyno IP ranges (e.g., 10.0.144.0/20 and 10.0.128.0/20) in your Private Space:
Destroying a peering connection
If you need to remove a peering connection, you can use the heroku spaces:peerings:destroy command. Provide the PCX ID of the connection to destroy:
$ heroku spaces:peerings:destroy pcx-111aaa111 --space amerine-peering-demo
 ▸    Destructive Action
 ▸    This command will attempt to destroy the peering connection pcx-111aaa111
 ▸    To proceed, type pcx-b3a62eda or re-run this command with --confirm pcx-111aaa111

> pcx-111aaa111
Tearing down peering connection pcx-111aaa111
Additional considerations and limitations
- Connections to web processes in a Private Space on
<appname>-<random-identifier>.herokuapp.comor a custom domain name are made over the public Internet, not the peering connection (unless using Internal Routing). - You can only connect to IP addresses in your VPC that are part of the primary CIDR block. If you have added secondary CIDR blocks to your VPC, they will not be reachable from the Private Space.
- You can connect from your VPC to dynos in the Private Space, but you must know the IP address in advance. Dynos do not have public DNS records (unless using Internal Routing).
- You cannot connect directly to data services such as Postgres, Kafka or Redis in the private space from the peered VPC.
- Dynos cannot connect directly to other networks that are peered to your VPC. Instead, you need to run a proxy or load-balancing service inside your VPC to enable such connections.
- You can peer up to 5 AWS VPCs to a private space. Open a support ticket if you need to peer more than 5 VPCs to your private space.