Last updated June 02, 2026
Heroku Postgres databases have connection limits based on your database plan. Reaching these limits results in connection request queueing and connection errors that degrade your application’s performance and reliability. Connection pooling with PgBouncer can solve this issue by sharing database server connections among clients.
This article:
- Provides an overview of how database connections and sessions work.
- Details the different types of connection pooling available with PgBouncer.
- Guides your implementation of connection pooling with PgBouncer on Heroku.
Heroku Enterprise customers with Premier or Signature Success Plans can request in-depth guidance on this topic from the Customer Solutions Architecture (CSA) team. Learn more about Expert Coaching Sessions here or contact your Salesforce account executive.
Database Connections, Sessions, and Connection Pooling
Connection pooling introduces important changes to how database connections and sessions work. To understand those changes, it’s important to first understand their normal behavior. Non-pooled connections follow a standard client-server connection architecture:
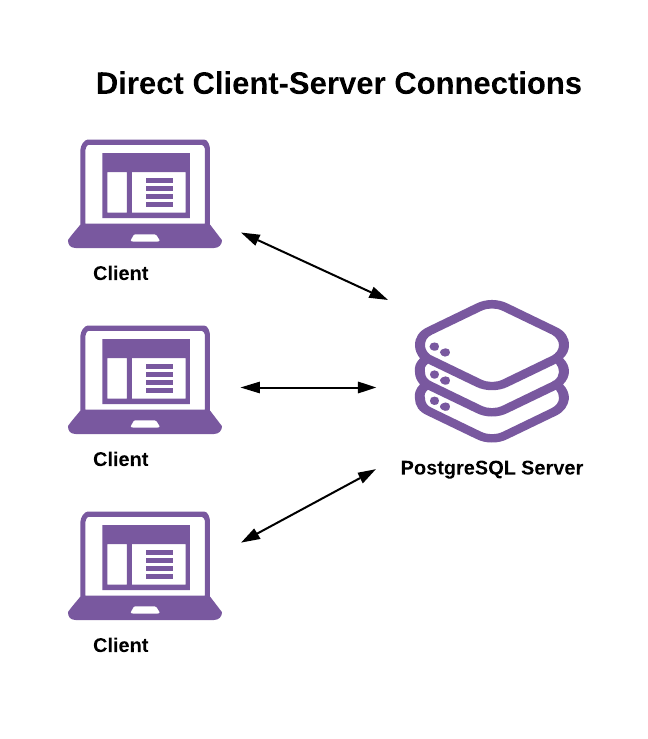
Here’s a high-level view of the PostgreSQL connection lifecycle without connection pooling:
- A client begins a new session by asking for and authenticating a connection to the server.
- The server forks a new system process to handle the connection and work session. The session’s state initializes based on a combination of server-level, database-level, and user-level configuration parameters.
- The client executes one or more transactions. Examples include:
- Execute reads and writes against relations (tables, views, and so on).
- Use the
SETcommand to change the session or transaction state. - Prepare and execute prepared statements.
- The session ends when the client disconnects.
- The server destroys the process that handled the session.
A database session consists of the work done over a single connection’s lifetime. Database sessions can be short or long-lived and consume varying amounts of resources on both the client and server.
The key takeaways are:
- Creating, managing, and destroying connection processes takes time and consumes resources.
- As a server’s connection count grows, the resources needed to manage those connections also grow. The memory usage required for each server process also grows as clients do work on them.
- A single session serves only a single client, so clients can change the session state and expect those changes to persist across successive transactions.
A connection pooler sits between clients and the server. Clients connect to the pooler and the pooler connects to the server. Introducing a connection pooler changes the connection model to a client-proxy-server architecture:
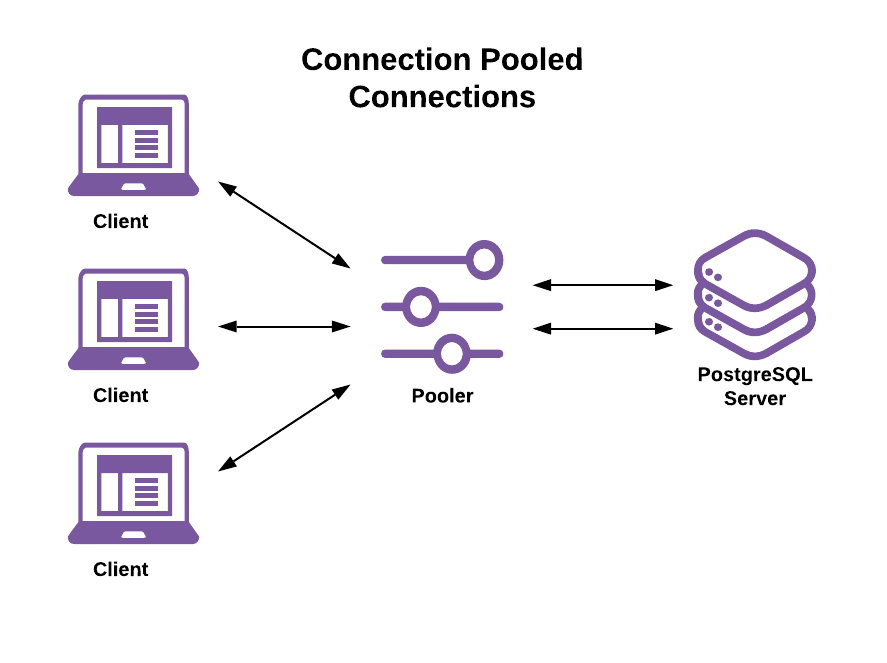
This configuration decouples the client connection lifetime from the server connection and process lifetime. The connection pooler is responsible for:
- Accepting and managing connections from the client.
- Establishing and maintaining connections to the server.
- Assigning server connections to client connections.
The connection pooler allows:
- A single-server connection to handle sessions, transactions, and statements from different clients.
- A single client session’s transactions and statements to run on different server connections.
In the rest of this article:
- “client connection” refers to a connection between a client and the connection pooler.
- “server connection” refers to a connection between the connection pooler and the database server.
A PgBouncer connection pool consists of all connections a single database user makes to a single database on a single host. For example, all connections ‘user1’ makes to ‘database1’ on ‘host1’ use the same pool on a given PgBouncer instance.
PgBouncer’s Connection Pooling Modes
PgBouncer has three pooling modes: transaction pooling, session pooling, and statement pooling. The pooling mode used:
- Determines how long a server connection stays assigned to a client connection.
- Imposes limitations on what a client can and can’t do, as described in the next sections.
Transaction Pooling Mode (Recommended)
Database clients rarely execute consecutive transactions with no pauses or idle between them. Apps perform non-database work between transactions, which means that server connections spend a lot of time idle while waiting for new work to arrive.
Transaction pooling mode reduces server connection idle time:
- The pooler assigns a server connection to a client when it begins a transaction.
- The pooler releases the connection assignment when the client’s transaction completes.
As a result:
- If a client runs more than one transaction, each transaction can execute on different server connections.
- A single-server connection can run transactions issued by different clients over its lifetime.
A transaction pooling approach supports a far larger number of active clients than the server’s connection limit. While it depends on the given workload, it’s common to see 10 times or more active client-connection to server-connection ratio. This ratio reduces the server resources needed for a given number of clients that share the pooled connections.
Transaction pooling comes with an important caveat. Clients can’t expect that changes made to database session state persist across successive transactions made by the same client, as those transactions can run on different server connections. Session state changes made by one client can affect other clients that reuse the same server connection afterwards.
Here are some examples using the earlier transaction pooling example image:
- If Client 1 sets the session to read-only on the first server connection in T1 and Client 2’s T3 is a write transaction, then T3 fails since it runs on the now read-only server connection.
- If Client 1 runs
PREPARE a1 AS ...in T1 and then runsEXECUTE a1 ...in T2, then T2 fails because the prepared statement is local to the server connection T1 was run on. - If Client 2 creates a temporary table in T3 and attempts to use it in T4, then T4 fails because the temporary table is local to the server connection T3 was run on.
Transaction Pooling Mode Benefits:
- Allow for more active clients than connections allowed by the server.
- Reduce server resources needed for a given number of clients.
Transaction Pooling Mode Caveats:
- You can only change the session state via
SETwithSET LOCALso that the changes are scoped only to the currently executing transaction. Never useSET SESSIONorSETalone, which defaults toSET SESSIONwith transaction pooling. - When using temporary tables, you must create, use, and drop them in the same transaction. Tip: Using
ON COMMIT DROPwhen creating temporary tables automatically drops them when the creating transaction finishes. - You can’t pass certain connection parameters, including
optionsto PgBouncer.
For a full list of session state features and operations that transaction pooling doesn’t support, see PgBouncer’s list.
Session Pooling Mode
With session pooling mode, server connection assignments to clients last for the lifetime of the client connections. This process seems similar to not using a connection pooler at all but the difference is that when an assigned client disconnects, it doesn’t destroy server connections. When a client disconnects the pooler, it:
- Clears any session state changes made by the client.
- Returns the server connection to the pool for use by another client.

Session Pooling Mode Benefits:
- Session pooling reduces the overhead and time spent creating new server connection processes when clients connect.
- Many ORMs and app frameworks provide session pooling via their built-in connection pools (for example, Ruby on Rails).
Session Pooling Mode Caveats:
- Because server connection assignments last for the lifetime of the assigned client connection, the number of active client connections still follows the server’s connection limit.
- Before using PgBouncer for session pooling, verify if your selected app framework or ORM uses a session pool.
- You can’t pass certain connection parameters, including
optionsto PgBouncer.
Statement Pooling Mode
With statement pooling mode, server connections assignments last only during a single statement. This process has the same session-state limitations as transaction pooling mode while also breaking transaction semantics.
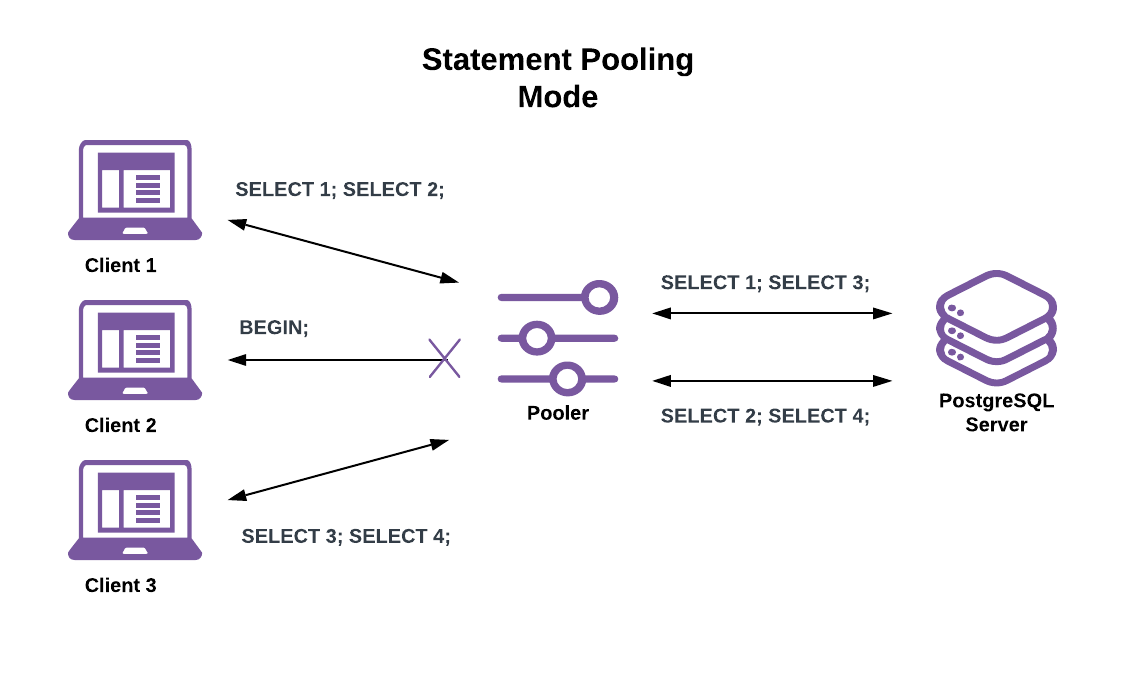
This mode makes all client connections behave as if in “autocommit” mode. The pooler returns an error when a client attempts to begin a multi-statement transaction. While that is limiting, it allows for even higher active client connection counts than with transaction pooling. Good use cases include serving a large volume of simple key lookups or issuing single-statement writes.
Statement Pooling Mode Benefits:
- Allows for far higher active client connections than even transaction pooling mode.
Statement Pooling Mode Caveats:
- Has the same session state restrictions as transaction mode pooling.
- Doesn’t allow multi-statement transactions.
- You can’t pass certain connection parameters, including
optionsto PgBouncer.
PgBouncer on Heroku: Server-Side vs. Client-Side
Server-side connection pooling isn’t supported on Heroku Postgres Advanced (Limited GA). Subscribe to our changelog to stay informed of when this feature is available for Advanced databases.
There are two options for using PgBouncer on the Heroku platform: Server-Side or Client-Side. The key features of each option are:
Server-Side
- Runs locally on the Heroku Postgres servers.
- Uses transaction pooling mode only.
- Supports up to 10,000 client connections.
- Doesn’t support user configuration changes.
- Only supports a single pool, associated with the default Heroku Postgres Credential.
- See Heroku Postgres Connection Pooling for setup and usage instructions.
Client-Side Buildpack
The PgBouncer buildpack is a classic buildpack. There currently is no Cloud Native Buildpack version.
- Runs locally on each dyno type configured to use it via your app’s Procfile and a buildpack.
- Allows the configuration of PgBouncer’s most common configuration options via your app’s config variables.
- Allows for multiple pools, using any number of Heroku Postgres credentials.
- See Client-Side Postgres Connection Pooling for installation and usage instructions.
Selecting Between Server-Side or Client-Side PgBouncer
While the server-side option has less configuration, it covers the most common use case of needing a simple-to-use transaction pooler. If at any point that becomes too restrictive, use the client-side buildpack instead.
Consider the server-side option first if:
- Transaction pooling mode is exactly what you need.
- You only use the default Heroku Postgres credential.
Use the client-side option if:
- You want complete control and configurability of your connection pooling.
- You use more than just the default credential.
- You need either of the session or statement pooling modes.
Configuring the Client-Side Buildpack
See Configurable Settings for details on configuring the client-side PgBouncer buildpack.