Last updated January 09, 2025
App webhooks enable you to receive notifications whenever particular changes are made to your Heroku app. You can subscribe to notifications for a wide variety of events, including:
- Changes to domain settings
- App builds
- App releases
- Add-on changes
- Dyno formation changes
Webhook notifications are sent as HTTP POST requests to a URL of your choosing. To integrate with webhooks, you need to implement a server endpoint that receives and handles these requests.
Getting started
To get started as quickly as possible, go to the webhooks interface in Dashboard or follow the app webhooks tutorial, which walks you through creating a simple webhook subscription in the CLI.
After you’ve completed the tutorial, return to this article for more information on subscribing to webhooks and receiving notifications.
Subscribing to webhooks via the Dashboard
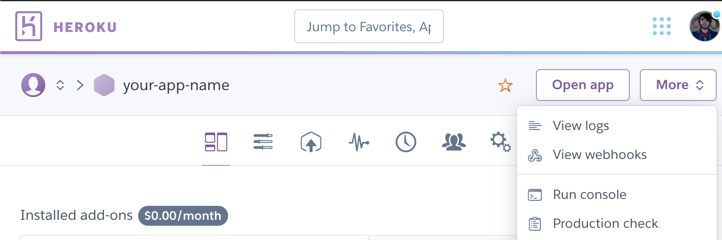
Go to the Dashboard page for your app and to to the dropdown menu below “More”. You will see an option to “View Webhooks” that will take you to the webhooks creation and management interface.
Subscribing to webhooks via the Heroku CLI
Step 1: Update the Heroku CLI
Commands for managing app webhooks are available in version heroku-cli/6.13.19 and later of the Heroku CLI. To ensure that you are using the latest version of the CLI, run the following command:
$ heroku update
Step 2: Determine which events to subscribe to
A webhook notification is sent whenever a relevant event occurs for the app you subscribe to. Every event has a type of create, destroy, or update, depending on the action it represents for its related entity. For example, the api:release create event occurs when a new release is initiated for your app.
You can subscribe to notifications for any combination of the following entities:
| Entity | Event Types | Description |
|---|---|---|
api:addon-attachment |
create, destroy |
An add-on has been attached or removed from the app. |
api:addon |
create, destroy, update |
An add-on for the app has been newly provisioned or deleted, or its details have been modified. |
api:app |
create, destroy, update |
The app itself has been provisioned or deleted, or its details have been modified. |
api:build |
create, update |
A new build for the app has been initiated or the build’s status has changed since the last notification. |
api:collaborator |
create, destroy, update |
A collaborator has been added or removed from the app, or an existing collaborator’s details have been modified. |
api:domain |
create, destroy |
Custom domain details have been added or removed from the app. |
api:dyno |
create |
A new dyno has begun running for the app. |
api:formation |
destroy, update |
The dyno formation for a particular process type has been modified. |
api:release |
create, update |
A new release for the app has been initiated or the release’s status has changed since the last notification. |
api:sni-endpoint |
create, destroy, update |
An SNI endpoint has been specified or removed for the app, or the existing SNI endpoint’s details have been modified. |
You automatically receive notifications for all applicable event types (create, destroy, and/or update) related to the entities you subscribe to. Concretely for each release you will always see at least two events: api:release create and api:release update. If your application is using release phase you will receive 3 events per release: create, update, update. Initially the status field will be set to pending but with the final update it will change to either succeeded or failed depending on the results of your release phase process, and current will be set to true once the release has been promoted to the current release.
See Webhook Events for example HTTP request bodies for all event types.
Step 3: Subscribe
You subscribe to webhook notifications with the heroku webhooks:add command. This command accepts the following flags (some of which are required):
| Flag | Description |
|---|---|
-i, --include (required) |
A comma-separated list of the entities you want to subscribe to notifications for. Possible values are listed in the table in the previous step. |
-u, --url (required) |
The URL of your server endpoint that will receive all webhook notifications. |
-l, --level (required) |
Must be either notify or sync. If notify, Heroku does not retry unsuccessful webhook notifications. If sync, Heroku retries failed requests until they succeed or until a determined limit is reached. |
-a, --app |
The name of the app to subscribe to. |
-t, --authorization |
A custom Authorization header that Heroku will include with all webhook notifications. |
-r, --remote |
The name of the git remote to run this command against. |
-s, --secret |
A value that Heroku will use to sign all webhook notification requests (the signature is included in the request’s Heroku-Webhook-Hmac-SHA256 header). If you omit this value, a generated secret is returned by the CLI. This value can never be retrieved again, so you must persist it immediately. If you don’t, you can run heroku webhooks:update to refresh the secret at a later time. |
The following example demonstrates subscribing to all webhook notifications related to dynos. In this example, notifications are not retried on failure, and all requests are sent to https://example.com/hooks:
$ heroku webhooks:add -i api:dyno -l notify -u https://example.com/hooks
Adding webhook to ⬢ app ... done
=== Webhooks Signing Secret
475beb0bf7de962fb89878a767c22f7de22154dae1e6996b6b33299e7a0f
As noted in the description of the --secret flag above, the CLI returns a generated secret because a value was not included in the command.
You can check notification delivery status with the heroku webhooks:deliveries command, described below.
Retries and limits
You can configure up to 10 independent webhook subscriptions on a single app, add-on, or pipeline.
If retries are enabled, Heroku will only attempt retries for 72 hours. If the code handling the webhooks notification fails for more than 72 hours, we will not retry those deliveries and we will discard them.
Since notification deliveries are intended to be ordered, all other notifications are delayed during retries. If this delay causes your app’s notification backlog to contain events older than 72 hours, then those events are attempted for delivery only one time and aren’t retried on a failure. If the backlog grows excessively large, additional webhook events can fail. If the overall failure rate grows high enough, Heroku can disable the webhook subscription entirely.
Heroku deletes webhooks that fail continuously. If your webhook fails continuously for one week, Heroku sends an email notification to inform you of the failures. The email includes the date of webhook deletion if it continues to fail.
Subscribing via the webhooks API
You use the Webhook Create endpoint of the webhooks API to subscribe to webhook notifications. See its reference for a list of required and optional parameters. Most of these parameters correspond to the parameters available when subscribing via the CLI.
Note that when communicating with webhooks API endpoints, your requests must include an Accept header with the value application/vnd.heroku+json; version=3.webhooks.
Securing webhook requests
Using the shared secret
To prove that the requests are coming from Heroku, the secret from webhook creation should be used in combination with the request header to verify that the shared secret signed the request. The following is some sample code for Ruby on Rails that takes a request and secret and determines if the request came from Heroku. The webhook_secret parameter should not be stored in application code, but instead in a secure location like a Heroku config var.
  def valid_signature?(request, webhook_secret)
    calculated_hmac = Base64.encode64(OpenSSL::HMAC.digest(
      OpenSSL::Digest.new('sha256'),
      webhook_secret,
      request.raw_post
    )).strip
    heroku_hmac = request.headers['Heroku-Webhook-Hmac-SHA256']

    heroku_hmac && Rack::Utils.secure_compare(calculated_hmac, heroku_hmac)
  end
Using the shared authorization
The authorization flag can also be used to verify that the request came from Heroku. If set, the authorization value is passed through in the Authorization header in the request. This shared secret is passed through without modification and should be validated using the authorization mechanism of your choice.
Managing subscriptions
After you create a subscription, you might want to review or delete it.
You can list your active webhook subscriptions with the Webhook List endpoint, or with the CLI:
$ heroku webhooks
You can remove a webhook subscription with the Webhook Delete endpoint, or with the heroku webhooks:remove CLI command.
Receiving webhooks
When a webhook event that you’ve subscribed to occurs, Heroku sends a POST request to your server endpoint with the details of the event. You can verify the authenticity of these requests in the following ways:
- The request’s
Authorizationheader matches the value you provided when subscribing to notifications. - The request’s
Heroku-Webhook-Hmac-SHA256header contains the HMAC SHA256 signature of the request body (signed with thesecretvalue provided when subscribing).
A resulting webhook notification request resembles the following:
POST https://example.com/hooks
Authorization: Bearer 01234567-89ab-cdef-0123-456789abcdef
Heroku-Webhook-Hmac-SHA256: cLM15U5x+jHEkANnVasRwBw2yEHu94pXdjcT9Hajc1M=
{
  "action": "update",
  "actor": {
    "email": "user-0436@example.com",
    "id": "096370c8-f3ad-4e20-a309-fb4f06ec0a89"
  },
  "created_at": "2016-10-26T22:50:14Z",
  "id": "d472a8bb-1a3c-4f78-aad1-995e6d0022ec",
  "data": {
    "archived_at": null,
    "buildpack_provided_description": "Ruby/Rails",
    "build_stack": {
      "id": "5e854079-da33-475b-a209-77f527c0e2fb",
      "name": "heroku-18"
    },
    "created_at": "2016-10-26T22:50:14Z",
    "id": "d4714cc8-aa56-4314-817c-0c6a66ff3d41",
    "git_url": "https://git.heroku.com/sample-app-0301.git",
    "maintenance": false,
    "name": "sample-app-0301",
    "owner": {
      "email": "user-0436@example.com",
      "id": "096370c8-f3ad-4e20-a309-fb4f06ec0a89"
    },
    "region": {
      "id": "7044c05a-0873-42c2-abbe-6841c5481ba7",
      "name": "us"
    },
    "organization": null,
    "space": null,
    "released_at": "2016-10-26T22:50:14Z",
    "repo_size": 1048576,
    "slug_size": null,
    "stack": {
      "id": "5e854079-da33-475b-a209-77f527c0e2fb",
      "name": "heroku-18"
    },
    "updated_at": "2016-10-26T22:50:14Z",
    "web_url": "https://sample-app-0301.herokuapp.com/"
  },
  "previous_data": {
  },
  "published_at": null,
  "resource": "app",
  "sequence": null,
  "updated_at": "2016-10-26T22:50:14Z",
  "version": "application/vnd.heroku+json; version=3",
  "webhook_metadata": {
    "attempt": {
      "id": "8a44f820-2354-489d-9a11-a793cbf49979"
    },
    "delivery": {
      "id": "d244009a-670f-4340-88e9-789a4f9002d5"
    },
    "event": {
      "id": "d472a8bb-1a3c-4f78-aad1-995e6d0022ec",
      "include": "api:app"
    },
    "webhook": {
      "id": "01234567-89ab-cdef-0123-456789abcdef"
    }
  }
}
You should always respond with a 200-level status code to indicate that you received the notification. Heroku ignores the body of your response, so a 204 status with an empty body is ideal:
204 No Content
If you do not return a 200-level status code, Heroku records the failure. You can view the failure in the CLI delivery log:
$ heroku webhooks:deliveries
If you subscribed at the sync notification level, Heroku retries failed requests until they succeed, or until the retry count is exhausted.
Checking delivery status
You can view a log of the notifications that Heroku has (or had) enqueued to send. Each notification has a status (one of pending, success, failure, or skipped) that you can check to monitor the current health of notification deliveries.
| Status | Description |
|---|---|
pending |
The attempt to deliver this webhook is enqueued. It’s attempted when there are no other pending deliveries for prior events. |
success |
The attempt to deliver the webhook to your configured endpoint resulted in a successful HTTP Response code (2xx). |
failure |
All the attempts to deliver the event for the last 72 hours have been unsuccessful and this event isn’t retried further. We’ll start attempting delivery for next event for the webhook. |
skipped |
If an event happened more than 72 hours ago, then it’s attempted for delivery only one time. If a non-successful response is returned, the delivery is marked as skipped. This usually happens if your endpoint has been continuously failing (represented by previous deliveries having a failed status). |
Introspecting deliveries with the CLI
Run the following command:
$ heroku webhooks:deliveries
Introspecting deliveries with the webhooks API
Use the Delivery List endpoint.
Looking up past events
If you have the id of a previously sent delivery, you can fetch the event’s details again.
Introspecting events with the CLI
Run the following command:
$ heroku webhooks:deliveries:info DELIVERY_ID
Introspecting events with the webhooks API
Use the Event Info endpoint.